Troubleshooting SOLIDWORKS
Table of Contents
- Solidworks Error Messages
- Why is Solidworks Running so Slow?
- Connection Issues
- Wrong Serial Number After Admin Image Install
- Using SolidWorks Rx for Diagnostics
- File Import and Conversion Issues
- SolidWorks Crashes on Startup
- Missing Toolbars or UI Elements
- Add-in Loading Failures
- Antivirus Exclusions
- File References and Save Failures
- Escalation Checklist
SOLIDWORKS Error Messages
License Server Connection Error (-15,10032,0)
“Could not obtain a license for SOLIDWORKS Standard. Cannot connect to a license server. (-15,10032,0)”
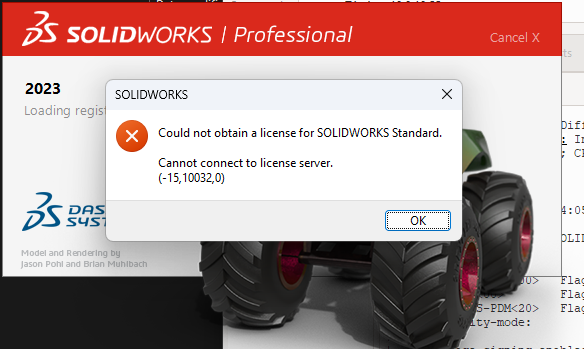
This error most likely means the Solidworks ports are closed on the server. Make sure the following ports are open on the Solidworks license server:
- 25734/tcp
- 25735/tcp
- 1433/tcp
- 1434/tcp
- 3030/tcp
- 25734/udp
- 25735/udp
- 1433/udp
- 1434/udp
- 3030/udp
The above section mentions both TCP and UDP ports. If you are only using TCP on your network, you can ignore the UDP ports. Opening the TCP ports should be sufficient.
Wrong Serial Number After Admin Image Install
Wrong serial number error after installing SolidWorks from an administrative image — even though the serial number in the image was verified correct.
Root cause: Stale registry entries or leftover folders from a previous SolidWorks install retain the old serial number, which conflicts with the one in the new admin image. A complete clean uninstall (including registry and folder purge) followed by a fresh reinstall resolves this.
Before uninstalling:
- Deactivate the license: in SolidWorks go to
Help→Deactivate License→ Select All → Next. This releases the activation so it can be reused on reinstall. - Back up any custom templates, toolbox databases, sheet formats, and design library files. Check their paths under
Tools→Options→File Locations. - Create a Windows Restore Point as a safety net before touching the registry.
Step 1 — Uninstall via Installation Manager
Go to Control Panel → Programs and Features, select your SolidWorks version, and click Uninstall. This opens the SolidWorks Installation Manager. Click Change next to Advanced Options and check all four boxes:
- Program Files and Folders
- Registry Entries ← critical for resolving the serial number conflict
- Data Files and Folders
- Download Files and Folders
Click Back to Summary, then Remove Items.
Step 2 — Manual registry cleanup (run as Administrator)
Open regedit (Windows search → right-click → Run as Administrator). Export/backup each key before deleting. Delete the following keys if they exist:
HKEY_CURRENT_USER\SOFTWARE - SolidWorks - Dassault Systemes\Composer - eDrawings - srac
HKEY_LOCAL_MACHINE\SOFTWARE - SolidWorks - Dassault Systemes\Composer - eDrawings - Srac - WOW6432Node\SolidWorks - WOW6432Node\Dassault Systemes\Composer
If PDM is installed, do not delete the entire SolidWorks key — only delete the Installation Manager and version-specific subkeys.
Step 3 — Manual folder cleanup
Enable hidden folders first: Control Panel → Folder Options → View → Show hidden files, folders, and drives. Delete the following folders if they exist:
C:\Program Files\SOLIDWORKS CorpC:\Program Files (x86)\SOLIDWORKS CorpC:\ProgramData\SOLIDWORKSC:\SOLIDWORKS DataC:\Users\[username]\AppData\Local\SolidWorksC:\Users\[username]\AppData\Roaming\SOLIDWORKS
Step 4 — Uninstall prerequisites (optional, for corrupted installs)
If the original installation was corrupted due to bad registry keys or improper permissions, also uninstall the Microsoft prerequisite programs that shipped with SolidWorks (e.g., Microsoft Visual C++ Redistributables, SQL Server Express if using PDM Workgroup). Look for these in Programs and Features. They will be cleanly reinstalled alongside SolidWorks.
Step 5 — Restart, then reinstall
Reboot before running the admin image installer. The serial number fields will now be completely clear with no conflicting cached entries from prior installs.
If SolidWorks does not appear in Programs and Features, use Microsoft’s “Fix problems that block programs from being installed or removed” tool (search for it on support.microsoft.com) to force-remove the stubborn install before proceeding.
Why is SOLIDWORKS Running Slow?
This can happen for a few different reasons. Start troubleshooting by checking the following:
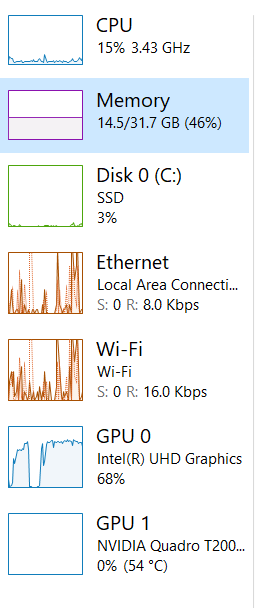
Is the machine using dedicated or integrated graphics for Solidworks?
To find the answer, open Task Manager while Solidworks is running and check to see if there are more than 1 entry for the GPU and what % is being consumed. Most engineering laptops will have 2 GPU entries in task manager. One for the integrated graphics and the other for the dedicated GPU. Solidworks will run extremely slow if using integrated graphics.
This screenshot shows a computer that’s using the integrated graphics for Solidworks rather than the dedicated GPU.
Task Manager If using the integrated graphics, open the NVIDIA control center and go to 3D Settings > Manage 3D Settings > Program Settings. Select Dassault Systems Solidworks from the drop down list. Then select “High performance NVIDIA processor” instead of “Integrated Graphics” and apply the changes.
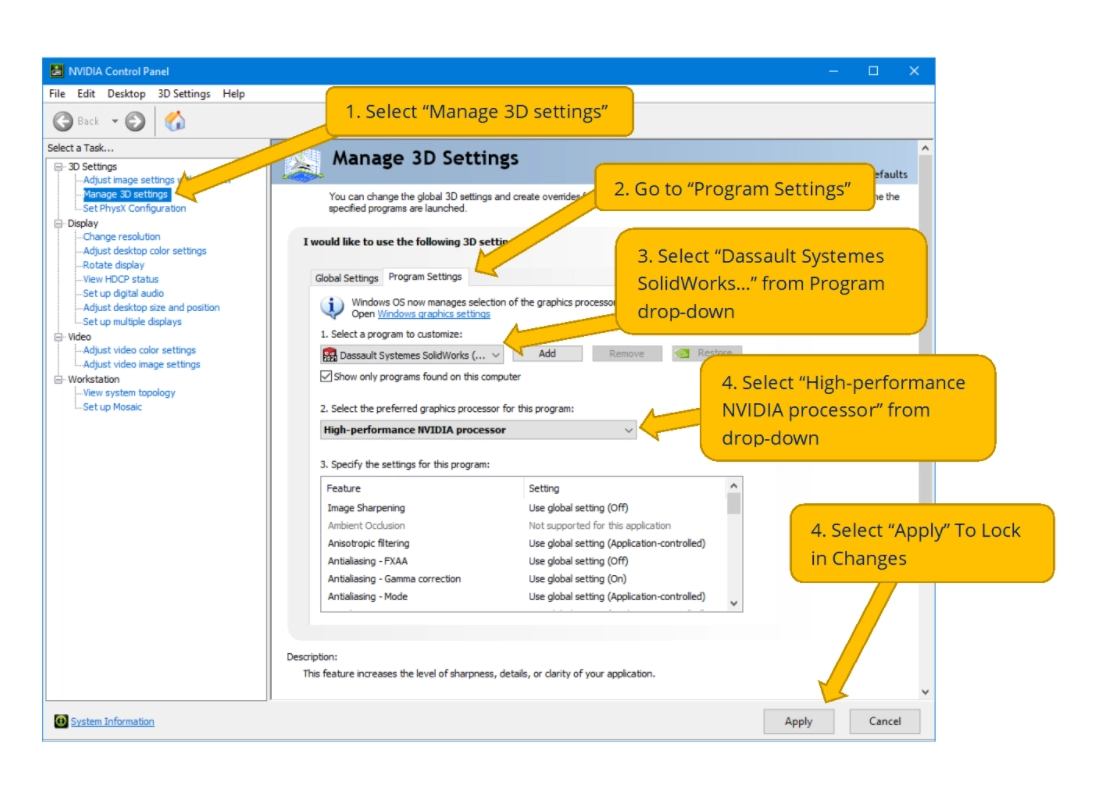
Nvidia Control Panel
How much RAM is being consumed? Is the machine running out of RAM when it feels slow?
- If the RAM is maxed out, try closing any web browsers to see if that helps.
- If RAM is the root cause, then we can purchase an upgrade for that computer. Most engineers should need no more than 32 GB, unless they are dealing with very large models in Solidworks.
How much CPU is being consumed?
- If you check your task manager and see that CPU usage is extremely high while GPU is low, go to SOLIDWORKS with no documents open. In the top left go to
Tools->Options. From this menu go toPerformanceand ensure thatUse Software OpenGLis NOT checked. Checking this means that SOLIDWORKS will bypass the GPU to use the CPU for rendering. This is commonly used to test whether or not performance issues are GPU related.
- If you check your task manager and see that CPU usage is extremely high while GPU is low, go to SOLIDWORKS with no documents open. In the top left go to
Are you using the correct GPU drivers?
- Drivers are important to make sure that your GPU functions properly. SOLIDWORKS makes drivers specifically for use of their software. Going through the SOLIDWORKS Hardware Certification website you can sort by make, model, and GPU. Install the recommend drivers, and if necessary use Guru 3D DDU to uninstall previous drivers properly.
- Drivers are organized by branch (e.g., NVIDIA R535, R550). Any driver within a certified branch is supported, so you can safely patch within the same branch family, but do not blindly install the latest NVIDIA driver — it is frequently from a newer, uncertified branch. Filter the certification page by your SolidWorks version and GPU model to get the exact recommended driver.
- When installing the certified driver, use the Custom (Advanced) → Perform a Clean Installation option to clear conflicts from prior driver versions.
- After driver installation, confirm inside SolidWorks at
Tools→Options→System Options→Performancethat “Use software OpenGL” is unchecked and “Enhanced graphics performance” is enabled. These options grey out when the driver is uncertified — which is itself a useful diagnostic signal.
Consumer GeForce and Radeon gaming cards are not certified — they may appear to work but commonly cause viewport flicker, black faces, transparency artifacts, and hard crashes, especially with RealView enabled. SOLIDWORKS supports the NVIDIA RTX A-series, RTX Ada generation, RTX PRO Blackwell, older Quadro RTX/P-series, AMD Radeon Pro, and Intel Arc Pro lines.
Is the machine working with a large assembly?
For assemblies over a few hundred parts, enable the following settings in
Tools→Options→System Options:- Large Assembly Settings — enable all sub-options
- Enhanced graphics performance — on
- Reduce auto-recover frequency or disable it for large assemblies
- Turn off Verification on rebuild during normal work (re-enable for final validation)
For truly massive assemblies (5,000+ components), use Large Design Review mode:
File→Open→ change Mode toLarge Design Review. This bypasses mate solving and in-context updates, loading only cached graphical data. Opens that take 20+ minutes in Resolved mode complete in seconds in LDR — useful for review meetings, measurements, and walkthroughs, though not suitable for active editing.When recommending hardware upgrades for engineers on large assemblies, the priority order is: high-clock-speed CPU (SolidWorks rebuild is largely single-threaded) → 32–64 GB RAM → NVMe SSD → certified GPU. A faster GPU will not fix a CPU-bound rebuild.
Connection Issues
- Cannot Connect to Server. This has two main parts PDM & Network License Server.
If users are getting an error
Cannot Connect to Archive Serverthis can be due to the archive server not booting properly. Connect to the SOLIDWORKS server either via Promox or RDP. In Windows search bar openServices. Scroll down and findSOLIDWORKS PDM Archive Server. Start the service.If users are getting a
Cannot obtain a license or cannot connect to license serverStart by connecting to the SOLIDWORKS server. Then in the Windows search bar findSolidNetWork License Manager. Open this app and it will pull up the license manager, there should be a button to Start the service.If a user is getting a
Failed to obtain a license for SOLIDWORKS PDM Standard. Cannot connect to the license server systemthis is solved differently. Start by opening a notepad session in administrator mode. Then in the top left go to File -> Open.C:\Windows\System32\drivers\etc. Make sure to search by all files. At the bottom tab over once and add the ip10.0.10.55and then following withsolidworks-pdm. See image below. Make sure to save changes.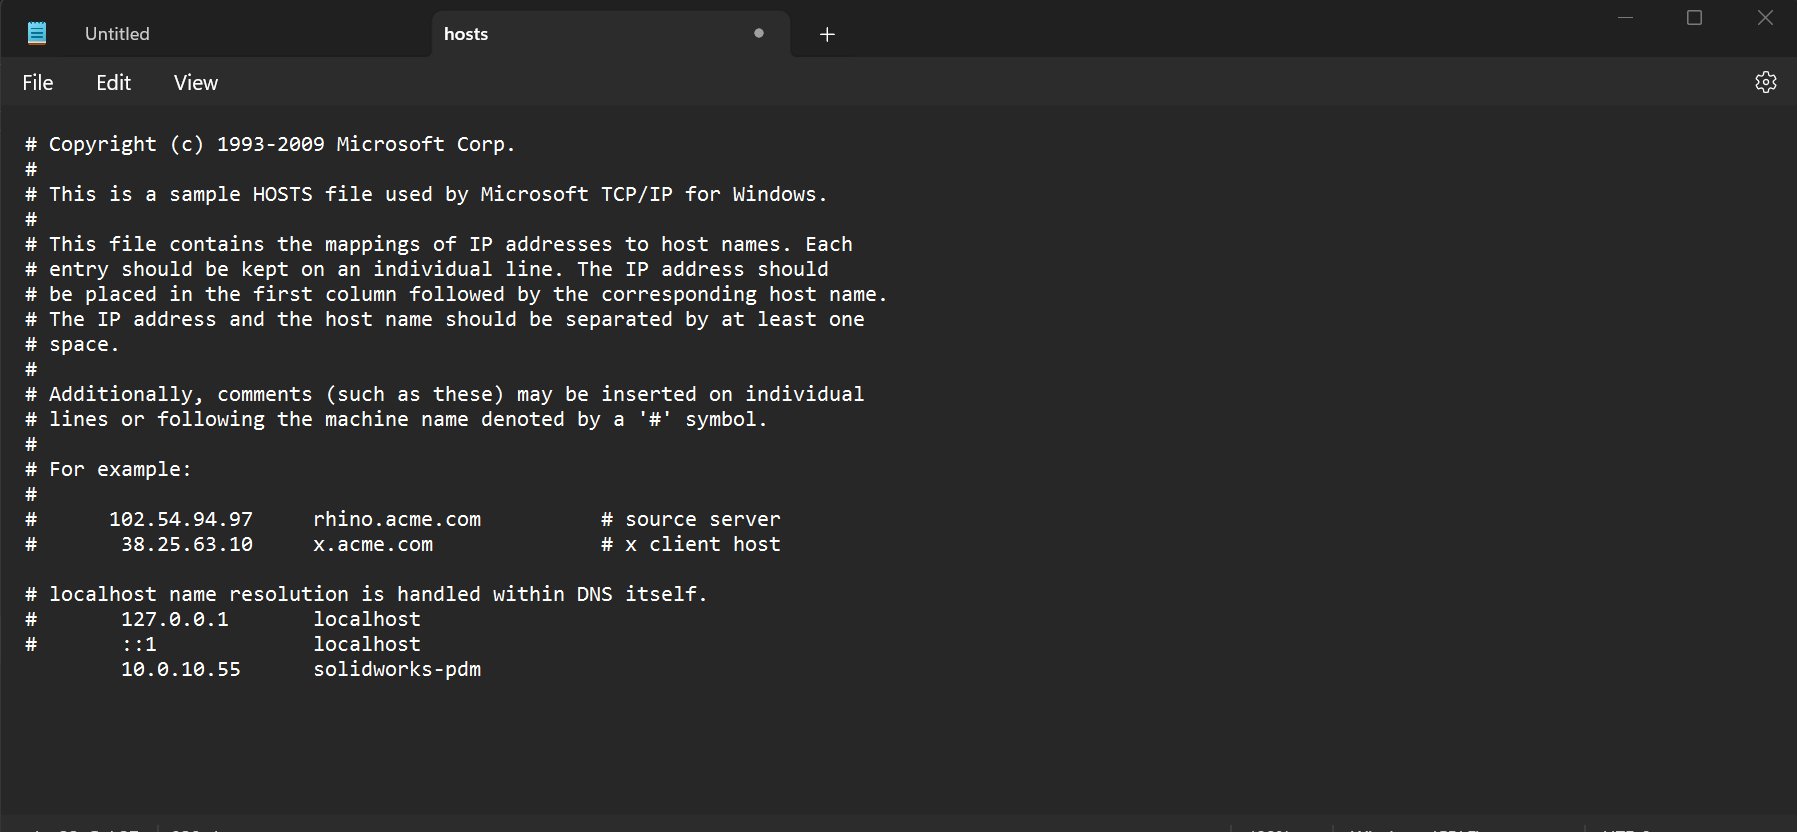
NotepadImage
Using SolidWorks Rx for Diagnostics
SolidWorks Rx is a built-in diagnostic tool included with every SolidWorks installation. It is the first tool to reach for when diagnosing performance problems, crashes, or hardware/software compatibility issues, and its output should be attached to any helpdesk ticket submitted to Dassault Systèmes support.
Opening SolidWorks Rx
Start→SOLIDWORKS Tools→SolidWorks Rx, or- Type
SolidWorks Rxin the Windows search bar and press Enter, or - Run directly:
%programfiles%\Common Files\SOLIDWORKS Shared\20XX\sldrx\sldrx.exe(replace20XXwith the installed version year)
Diagnostics tab
The Diagnostics tab runs an automated check of the hardware and software environment (operating system, drivers, graphics card certification, .NET version, and more). To use it:
- Open SolidWorks Rx and click the
Diagnosticstab. - Click
Run Diagnosticsand wait for the scan to complete. - Review any items flagged as warnings or failures — these indicate mismatches between your system and SolidWorks’ certified requirements.
- Click
Saveto export the diagnostics report as a.txtfile.
A common finding is an uncertified graphics driver. Cross-reference the flagged driver version against the SOLIDWORKS Hardware Certification page and install the certified driver if available.
Problem Capture tab
Problem Capture records a reproducible issue so the support team can observe exact reproduction steps along with system state. Use this when a bug or crash is intermittent and hard to describe:
- Click the
Problem Capturetab. - Enter a brief description of the issue, then click
Start Recording. - Reproduce the problem in SolidWorks. SolidWorks Rx captures screen activity and logs in the background.
- Return to SolidWorks Rx and click
Stop Recording. - Click
Saveto package the recording and logs into a.zipfile.
Attach the saved .zip file and the diagnostics .txt file to the helpdesk ticket when escalating to Dassault Systèmes support.
Safe modes for crash isolation
SolidWorks Rx includes two safe modes that together isolate the majority of chronic crash tickets:
- Software OpenGL Mode — bypasses the GPU entirely and routes rendering through the CPU. If crashes stop in this mode, the fault is almost certainly the graphics card or driver. Launch this from the Rx interface and test the crashing scenario.
- Bypass Tools/Options — launches SolidWorks while ignoring user settings stored in the registry. If crashes stop here, user settings or registry corruption are the cause. Resolve it with
Tools→Save/Restore Settings→Reset Settings(back up first withSave Settings).
Reliability tab
The Reliability tab surfaces the last 60 days of SolidWorks session terminations mapped against Windows driver crashes, patch installs, and network failures. Use this to correlate “it started crashing last Tuesday” with a Windows Update or driver push from Intune or your endpoint management system.
File Import and Conversion Issues
Imported STEP or IGES files show missing geometry or corruption
When geometry is lost or malformed after importing a STEP (.step/.stp) or IGES (.iges/.igs) file:
- Open the original file in the source CAD application and verify the geometry is intact there.
- Re-export from the source CAD application, explicitly selecting STEP AP214 format (broader support than AP203 or AP242 for surface data).
- In SolidWorks, go to
Tools→Options→Importand confirmSTEPis set to import as a solid body, not a surface body. - After import, run
Tools→Check(orCheck Entity) on the imported body. Any errors listed indicate faces that failed to knit — useInsert→Surface→Fillto patch missing faces. - If geometry is still incomplete, ask the sender to export as Parasolid (
.x_t/.x_b) instead; Parasolid is SolidWorks’ native kernel and transfers with higher fidelity.
IGES is an older format with less reliable geometry transfer than STEP. Prefer STEP or Parasolid whenever the source application supports it.
DXF import issues (malformed geometry, lost colors, scaling problems)
- Scaling: When prompted during import, verify the import unit matches the unit used in the originating application (e.g., millimeters vs. inches). A 25.4× or 0.0394× size mismatch almost always means a unit mismatch.
- Malformed geometry: Open the DXF in a neutral viewer (e.g., DWG TrueView) and confirm geometry is correct before blaming SolidWorks. If it is correct in the viewer, try importing with
Tools→Options→Import→DXF/DWGset to merge points within a tighter tolerance. - Lost colors/layers: DXF layer colors map to SolidWorks sketch colors only if
Import→Maintain layer infois checked. Enable this option before importing.
SolidWorks Crashes on Startup
When SolidWorks fails to open (crashes immediately or during the splash screen), the most common causes are a corrupted add-in or a damaged prerequisite.
Disable all add-ins and restart
- Hold
Ctrlwhile double-clicking the SolidWorks shortcut. This launches SolidWorks with all add-ins suppressed. - If SolidWorks opens successfully, an add-in is the cause. Go to
Tools→Add-insand re-enable add-ins one at a time, restarting after each, until the crash recurs. The last add-in enabled is the culprit — update or reinstall it.
Clear the settings registry key
If suppressing add-ins does not resolve the crash:
- Close SolidWorks.
- Open
regeditas Administrator and navigate toHKEY_CURRENT_USER\SOFTWARE\SolidWorks\SOLIDWORKS <version>. - Export that key as a backup, then delete it.
- Restart SolidWorks — it will rebuild defaults on first launch.
Deleting this key resets all user preferences (toolbars, templates, file locations). Restore them from your backup or from Tools → Options after confirming SolidWorks launches successfully.
Repair or reinstall prerequisites
If both steps above fail, a damaged Microsoft Visual C++ Redistributable or DirectX component may be the cause:
- Open
Programs and Featuresand look for Microsoft Visual C++ Redistributables listed under the SolidWorks install year (e.g., 2015–2022 Redistributable x64). - Right-click each and select
Repair. - Restart the computer and attempt to launch SolidWorks again.
- If repair fails, perform a full clean uninstall and reinstall as described in the Wrong Serial Number After Admin Image Install section, which covers complete registry and folder cleanup.
Splash-screen hang (libcef.dll / Chromium Embedded Framework)
If SolidWorks freezes at the splash screen and never loads, the Chromium Embedded Framework (CEF) cache may be corrupted:
- In
Programs and Features, uninstall CEF for SOLIDWORKS. - Reboot.
- Delete
%temp%\swcefcache. - Re-run the SolidWorks installer as Administrator to reinstall CEF cleanly.
Splash-screen hang over RDP
SolidWorks 2020 SP5 and adjacent versions have a known issue where the splash screen hangs when launched over a Microsoft RDP session. This is not a misconfiguration — switch to a different remote-access tool (e.g., TeamViewer, Parsec, or the Proxmox console) or use a local login session.
Missing Toolbars or UI Elements
After a SolidWorks update, toolbars, Command Manager tabs, or menu items may disappear. The most common causes are a reset of the UI registry key or add-in re-registration during the update.
Reset the Command Manager
- Right-click anywhere on the Command Manager or toolbar area.
- Select
Customize→Toolbarstab. - Check any toolbars that should be visible and click
OK.
Restore UI defaults
If the Command Manager is missing entirely or severely corrupted:
- Go to
Tools→Customize→ clickReset to Defaultsat the bottom of the dialog. - Click
Yesto confirm. SolidWorks will restore the factory toolbar and menu layout.
Any custom toolbar arrangements will be lost. If the user had a heavily customized layout, have them take a screenshot before resetting so they can rebuild it.
Reset user settings (when one user is affected but others on the same image are not)
When missing toolbars or phantom dialogs affect a single user but not colleagues on the same machine image, corrupted per-user settings in the registry are the cause (HKEY_CURRENT_USER\Software\SolidWorks\SOLIDWORKS 20XX). Use the built-in reset rather than editing the registry directly:
- In SolidWorks go to
Tools→Save/Restore Settings→Save Settingsand export a.sldregbackup. - Then go to
Tools→Save/Restore Settings→Reset Settingsand confirm. - SolidWorks restarts with factory defaults. Verify toolbars are restored before re-importing the backup — restoring the backup can reintroduce the corrupting setting. In stubborn cases, have the user rebuild customizations from scratch.
If SolidWorks won’t launch at all, back up and delete the SOLIDWORKS 20XX subkey directly in regedit — SolidWorks recreates it on next launch.
Reinstall or re-register a problematic add-in
If tabs specific to a third-party add-in (e.g., PDM, Simulation, CAM) are missing:
- Go to
Tools→Add-insand verify the add-in is checked for bothActive Add-insandStart Up. - If the add-in is listed but its toolbar is still missing, uncheck it, click
OK, then re-check it and clickOKagain to force re-registration. - If the add-in is not listed at all, navigate to its installer and run a
Repairinstallation.
Add-in Loading Failures
Add-ins that fail to load typically produce a warning at SolidWorks startup or appear unchecked in Tools → Add-ins even when previously enabled. The two primary causes are COM registration errors and API version incompatibility.
Re-register the add-in DLL
Locate the add-in’s
.dllfile (usually underC:\Program Files\SOLIDWORKS Corp\SOLIDWORKS\or the third-party vendor’s install folder).Open a Command Prompt as Administrator and run:
regsvr32 "C:\full\path\to\addin.dll"If registration succeeds, restart SolidWorks and check
Tools→Add-ins.If
regsvr32returns an error, the DLL itself may be missing a dependency — proceed to the repair step below.
Check for API version incompatibility
Third-party add-ins compiled against an older SolidWorks API version may refuse to load after a major SolidWorks update:
- Open the SolidWorks Event Log:
Tools→SolidWorks Event Log. Look for an entry referencing the add-in and note the error code or message. - Check the add-in vendor’s release notes to confirm compatibility with the installed SolidWorks version.
- If an updated add-in version is available, download and install it. If not, you may need to remain on the prior SolidWorks version until the vendor releases a compatible build.
Repair the add-in installation
- Open
Programs and Features, locate the add-in’s entry, and selectRepair(orChange→Repair). - Restart SolidWorks after the repair completes and verify the add-in loads in
Tools→Add-ins. - If repair is not available, uninstall the add-in and reinstall from the original installer or vendor download portal.
Antivirus Exclusions
Antivirus real-time scanning causes install failures, splash-screen hangs, slow saves, PDM check-in errors, and the InProcessClient64.dll crash on 3DEXPERIENCE-connected machines. SolidWorks-specific file types can number in the thousands during a single assembly open, and scanning each one serializes I/O behind the AV engine.
Configure the following exclusions in Windows Defender, CrowdStrike, SentinelOne, Sophos, or whichever EDR is in use.
Process exclusions
sldworks.exeswShellFileLauncher.exe- PDM executables:
ConisioAdmin.exe,CardEdit.exe,File.Viewer.exe,Report.exe,Search.exe - 3DEXPERIENCE (if applicable):
3DEXPERIENCELauncherGUI.exe,3DEXPERIENCELauncherBackbone.exe
Folder exclusions
C:\Program Files\SOLIDWORKS Corp\C:\Program Files\Dassault Systemes\C:\ProgramData\SolidWorks\%LOCALAPPDATA%\SolidWorks\- The user’s local working folder
- The PDM vault view root (e.g.,
C:\PDMVault\)
File-type exclusions
*.sldprt, *.sldasm, *.slddrw, *.sldlfp, *.sldblk
Disabling AV from the system-tray icon only suspends active scanning — registry protection stays on, which still blocks SolidWorks installs and upgrades. For install or major patch operations, coordinate a full service stop with your security team. Tray-icon “disable” is insufficient and is the root cause of many “install completed successfully but won’t launch” tickets.
File References and Save Failures
“Unable to locate the file” errors
SolidWorks searches for referenced files in a specific order: RAM cache → Tools → Options → File Locations → Referenced Documents path → the active document’s folder → UNC paths → user browse prompt.
For IT, the two highest-leverage fixes are:
- After a file-server migration or drive-letter change, add the new server share to
Tools→Options→File Locations→Referenced Documents. - Enforce unique filenames organization-wide — two different
BOLT.sldprtfiles on the same machine is a guaranteed reference mismatch.
For broken references in an open assembly, use File → Find References to see every referenced file and its expected path. For assemblies with dozens of broken references, click References in the Open dialog before loading the assembly and edit all paths in bulk before geometry loads.
To inspect or sever in-context (external) links, right-click a component → External References → Break All.
“Failed to save document” errors
This error clusters around five fixes in descending order of success:
- Close all non-essential open documents to free RAM, then retry the save.
- Force a full rebuild with
Ctrl+Q, then save. - Use
File→Find References→Copy Files(Pack and Go) to save a copy to a new location and verify the copy saves cleanly. - Toggle the assembly to Lightweight mode, then back to Resolved, then save.
- Enable
Tools→Options→Performance→Verification on rebuildto surface geometry errors that may be blocking the save.
A save that hangs indefinitely on drawings in SolidWorks 2020+ is almost always the Detailing Mode feature. Disable Tools → Options → Drawings → Performance → Include detailing mode data when saving (moved to Document Properties in 2022+).
PDM vault connection failures
PDM connection issues follow a predictable diagnostic order:
- Version mismatch — all PDM components (archive server, SQL database, client) must match on the same major version. Check client version in
PDM Administration→About. Check the database version in SQL Management Studio:SELECT * FROM dbo.Upgrades(for PDM 2019+, subtract 8 from the version number to get the year). - SQL password mismatch — verify the
sapassword in Archive Server Configuration matches what is configured in SQL Server. - Registry pointers — confirm the registry keys at
HKEY_LOCAL_MACHINE\SOFTWARE\WOW6432Node\SolidWorks\Applications\PDMWorks Enterprise\Databases\[VaultName]point to the correctDbServerandServerLocvalues. Restart theSOLIDWORKS Archive Serverservice after any change. - Stuck check-outs — PDM admins can force-release stuck check-outs via right-click →
Undo Check Outin the PDM vault. For mass release of check-outs from a vacated or terminated employee’s account, a batch utility using theIEdmBatchUnlock2API interface is available.
Escalation Checklist
When a ticket must escalate to a VAR (Hawk Ridge, GoEngineer, Javelin/TriMech, etc.) or Dassault Systèmes support directly, collect and attach these artifacts in a single upload:
| Artifact | How to collect | What it shows |
|---|---|---|
| SolidWorks Rx ZIP | Rx → Problem Capture → record repro steps | Full system state, settings, crash dumps, screen recording |
Crash dump (.dmp) |
%LOCALAPPDATA%\SOLIDWORKS\SOLIDWORKS 20XX\CXPA |
Faulting module for DLL-level analysis |
| Windows Event Viewer logs | Application log filtered on SLDWORKS.exe |
Distinguishes a SW fault from a Windows fault |
| Hardware and driver version | Rx Diagnostics tab → Save | Certification compliance |
| Reproducible file | File → Pack and Go of the failing assembly |
Determines whether the fault is file-specific or environment-specific |
The most important thing you can do is establish a repeatable trigger. Random crashes with no reproduction steps rarely get diagnosed. The same crash reproduced on a second machine with the same file points unambiguously to file corruption or a SolidWorks bug; a crash that only one user experiences points to their environment.