Windows 11 and Intune Autopilot
This guide shows you how to create a custom Win 11 iso and configure it for the Intune Autopilot OOBE.
Prerequisites
You will need the following before completing this guide.
Technician computer: The computer, such as your work laptop, that you will use to prepare answer files and other assets needed for the custom install. This laptop can have any version or edition of Windows 11.
Reference computer: A computer with no OS installed. Using a VM as the reference machine is the easiest option. This machine will be used to clean install Windows 11, customize, sysprep, and then capture the custom ISO image from it. Must also fulfill the following minimum hardware requirements to support Windows 11
- CPU: 1 Ghz or faster with 2 or more cores and appearing on Microsoft’s list of approved CPUs.
- RAM: >= 4GB
- Storage: >= 64GB
- System Firmware: UEFI and Secure Boot capable.
- TPM: TPM 2.0 or newer version
- GPU: DirectX 12 or later
- Display: 720p display that is greater than 9” diagonally, 8 bits per color channel. If your screen size is less than 9”, the intended user interface of Windows may not be fully visible.
Admin privileges on the Technician computer.
Contents
- Part One: Install Windows System Image Manager
- Part Two: Create a Catalog File
- Part Three: Create Answer file for Windows Setup
- Part Four: Create Answer file for OOBE
- Part Five: Prepare Assets
- Part Six: Install Windows 10 on Reference Machine
- Part Seven: Customize and Capture Windows Image
- Part Eight: Create USB Install Media
- Part Nine: Deploy the Custom Windows Image
- Part Ten: Issue Computer to User
- Troubleshooting
Part One: Install Windows System Image Manager
- Download the Windows ADK and install on the technician computer.
- Run the ADK installer and select the option to install to this computer. Select the
Deployment Toolsfeature and install it. - Open and run the
Windows System Image Managerapp that was installed.
Part Two: Create a Catalog File
- Mount the Windows 11 ISO on the technician computer.
- Create a folder to store your custom image in.
- Open the ISO folder and copy all of its content to the folder you created in step 2. Unmount the ISO after copying the files.
- This guide requires a
install.wimfile which should be located incopied_iso_files/sources/install.wim. If you have aninstall.esdfile instead, then you must first convert to a wim file before continuing.- If applicable, delete the ESD file after converting it to a WIM. You cant have both the esd and wim file in the custom image.
- Start the Windows System Image Manager (WSIM) on the technician computer.
- In WSIM, select File > New Answer File. You will be asked if you want to open a Windows system image. Select yes. Browse to and select the WIM file:
copied_iso_files/sources/install.wim. Make sure to select the Windows 11 Pro image. - On your first time, you will be prompted to create a catalog file. Select yes. It will take some time to create the catalog file, so nows a good time for a coffee refill.
Part Three: Create Answer File For Windows Setup
This part is only required if you want the complete Windows Setup process to be automatized, plugging in USB and boot to it then take a break and come back later to sign in to desktop.
If you prefer a standard installation, boot to Windows Setup region and keyboard selection and partitioning Windows system disk manually with Windows Setup, you can skip this part.
Windows installation is done using
configuration passes. More info on configuration passes can be found here. An answer file is created by adding components to the different configuration passes. There are 7 different configuration passes and they are listed under the answer file components section in WSIM.Expand the Windows Image components section in WSIM.
To add region and language settings to answer file, right click component International-Core-WinPE, select Add Setting to Pass 1 windowsPE. Be sure to add International-Core-WinPE component, the one just above it has almost the same name without WinPE part. Adding the wrong component makes the answer file invalid!
The selected component will now be added to the Answer file pane. Select it and fill in the various fields appropriately.
- InputLocale: Your preferred default keyboard layout
- SystemLocale: Your country or region
- UILanguage: Windows language
- UserLocale: PC location
For the InputLocale, you can get a list of keyboard layout codes here. The code for the USA English keyboard layout is
0409:00000409. For the remaining fields you can put en-US. UILanguageFallback is the language to be used for resources, notifications and system messages that are not localized (translated) to current Windows system language. You can also use an elevated powershell session to get the localization info:dism /online /get-intlIn the answer file pane, expand the International-Core-WinPE component and select
SetupUILanguageand set the locale code forUILanguage. In almost all cases, this will been-US.In the Windows Image pane browse to and select
Setupand add it to pass 1 WinPE.Expand the setup component and select
UserData. SetAcceptEulato true and add an organization name.Expand
UserDatanow and selectProductKey. We will use a KMS key so that the ISO works, but you will need to provide an active product key after installation. (No product key in the autounattend.xml file will break the custom iso). See this link for more info on generic KMS keys.Next we will configure partitions and create the Windows system disk. This guide creates a single disk which is partitioned to use its max capacity after the required system partitions have been created. In the Answer File pane, expand Setup and right click on
DiskConfigurationand selectInsert New Disk.Select the disk you added in Answer File pane, set DiskID to be 0 and WillWipeDisk to true.
Expand Disk 0 and right click on
Create Partitionsand selectinsert New CreatePartition. We must create 4 partitions to support UEFI/GPT: WinRE, EFI, MSR, and Windows. Repeat and add 4 different partitions under Disk 0. Use the following chart to fille in the required info for each partition. The order in which paritions are created must be the same as listed order. Ex. First partition created must have order 1.Partition Extend Order Size (MB) Type WinRE False 1 450 Primary EFI False 2 100 EFI MSR False 3 16 MSR Windows True 4 Leave empty to consume all remaining space Primary Under the Answer File pane, right click on
ModifyPartitionsand selectInsert New Modify Partition. Create 4 of these as well, one for each partition created on the previous step.Since we are using GPT disks, we must configure the following for each
ModifyPartitionconfig:Partition Label Order PartitionId Letter Format TypeID ModifyPartition1 WinRE 1 1 NTFS DE94BBA4-06D1-4D40-A16A-BFD50179D6AC ModifyPartition2 System 2 2 FAT32 ModifyPartition3 (MSR) 3 3 ModifyPartition4 Windows 4 4 C NTFS See this link for more information on the Type ID used for the WinRE partition. At the end of this step, you should have 4
CreatePartitionsand 4 correspondingModifyPartitions.Under the Answer File pane, expand
ImageInstall > OSImageand selectInstallToand setDiskIDto 0 andPartitionIDto 4. This tells the image to install Windows on Partition 4 from step 13.Next we will delete the unused Setup components we haven’t modified. Right click and delete each unmodified object.
In the menu bar, click on Tools > Validate Answer File to check for possible errors. If any errors are shown, resolve them and then validate again. You can proceed once no warnings or errors are shown.
Save the answer file as an autounattend.xml file in your custom iso folder from part 2 step 2:
File > Save Answer File As. Close the answer file once saved.
Part Four: Create Answer File for OOBE
- Create a new answer file.
- Under the Windows Image pane, expand components and select
International-Coreand add it toPass 7 oobeSystem. (Not International-Core-WinPE) - Under the windows image pane, expand the
Shell-Setupcomponent and addOEMInformationtoPass 4 Specialize.- Add
Shell-Setup > OOBEtoPass 7 oobeSystem - Add
Shell-Setup > UserAccountstoPass 7 oobeSystem
- Add
- Now under the Answer File pane, select
Shell-Setupand set the following with appropriate values:- CopyProfile: True
- OEMName: Xenter
- RegisteredOrganization: Xenter, Inc.
- RegisteredOwner: Xenter, Inc.
- TimeZone:
Mountain Standard Time. See this link for the list of time zone names you can use to populate this field.
- Next under
OEMInformation, add values for the following fields if desired:- Logo:
C:\Users\Public\Pictures\xenter-logo.png(The file path to logo image) - Manufacturer: Xenter, Inc.
- SupportHours: Current helpdesk hours
- SupportPhone: Phone number for helpdesk
- SupportURL: Enter the current helpdesk URL
- Logo:
- Under the answer file pane > 7oobeSystem > select
International-Coreand fill in the locale info. This should match the same locale information from the first answer file.- InputLocale: 0409:00000409
- SystemLocale: en-US
- UILanguage: en-US
- UserLocale: en-US
- Under the answer file pane > Shell-Setup > OOBE, set the following fields:
- HideEULAPage: True
- HideOEMRegistrationScreen: True
- HideLocalAccountScreen: True
- HideWirelessSetupInOOBE: True
- ProtectYourPC: 1 (See this link for possible values, 1 is recommended)
- UnattendEnableRetailDemo: False
- Under the answer file pane > Shell-Setup > User Accounts, select AdministratorPassword. Refer to Bitwarden or the current corporate password manager and use the main password stored for Default Xenter IT Password. This sets the password for the Administrator account. No local accounts are required since we will be using AzureAD logins instead.
- Delete any unmodified components and then validate this answer file. Save this file as unattend.xml and place it inside of the Assets folder created in Part 5 step 1.
Part Five: Prepare Assets
Create a new folder on the technicians machine to store assets and other files in which will be included in the custom iso image. Do not save this assets folder in the same folder as the other ISO files. Its recommended to put this folder in your work OneDrive account so that it can be easily accessed from the reference machine in part seven.
If you set the logo image earlier on step 5, then place a copy of the file in the assets folder. You can also copy any custom Windows theme files here as well. Then create a new file named
RunOnce.batinside the assets folder and paste the following code:echo Y | del %appdata%\microsoft\windows\recent\automaticdestinations\* del %0Do not run the batch file, it deletes itself! If you want to test it, make a copy and run it instead. This file will be copied to default user profile on reference machine, and from there to every user profile. It runs itself every time any user signs in first time clearing This PC, Quick Access and Recent files views, then deletes itself. Without it, some leftovers from reference machine’s built-in administrator account would be shown in Quick Access.
Add any software installers you want to include in the image to the assets folder.
Part Six: Install Windows 11 on Reference Machine
Using a VM as the reference machine is the easiest option, but you could use a physical machine if you want. You can use Hyper-V, VirtualBox, or VMWare to create the virtual machine and test. It is recommened to use Hyper-V.
- Create a virtual machine that meets the minimum requirements listed above under the prerequisites section. (Skip this step if using a physical machine.)
- If using a Hyper-V VM as reference machine, open its settings before booting and disable (unselect) automatic checkpoints. Be sure you are using Standard checkpoints. You must leave the
Network AdapterasNot connectedat first. The VM cannot have internet access until after you are in Audit mode.
- If using a Hyper-V VM as reference machine, open its settings before booting and disable (unselect) automatic checkpoints. Be sure you are using Standard checkpoints. You must leave the
- Install Windows 11 normally until OOBE starts and region settings screen is shown. Do not select anything, just press CTRL + SHIFT + F3 to restart to Audit Mode (press and hold down both CTRL and SHIFT keys, press F3, release all three keys).
- Windows will restart and sign you in to Audit Mode with built-in administrator account. Sysprep Prompt will be shown on screen. Click Cancel to close it.
Part Seven: Customize and Capture Windows Image
Connect the reference machine to the internet (ethernet or wifi).
If you saved the assets to OneDrive, open MS Edge go to xentermd-my.sharepoint.com and open the Assets folder.
Copy the unattend.xml file to the
C:\Windows\Pantherfolder.If using a logo from part 4 step 5, save the logo file to the file path you used in the answer file that was created.
Copy the xenter-wallpaper.png file to
C:\Users\Public\Public PicturesCopy the
RunOnce.batto theC:\Users\Administrator\AppData\Roaming\Microsoft\Windows\Start Menu\Programs\Startupfolder.If you added theme files to the asset folder, apply theme now.
Run any software installers. Note that the software installations must be machine-wide. Meaning it will be available to all user accounts.
Create two new folders on root of C: drive, name them
C:\ImageandC:\Scratch. These folders will be needed when we capture the image. In the root C drive, delete anyWindows.oldfolder if present.Check for any updates in
Windows Updates.Register this machine’s hardware hash with Azure AD so that it can be used with the Autopilot process. Execute this code from an administrative powershell session and sign in with your AzureAD credentials.
[Net.ServicePointManager]::SecurityProtocol = [Net.SecurityProtocolType]::Tls12
New-Item -Type Directory -Path "C:\HWID"
Set-Location -Path "C:\HWID"
$env:Path += ";C:\Program Files\WindowsPowerShell\Scripts"
Set-ExecutionPolicy -Scope Process -ExecutionPolicy RemoteSigned
Install-Script -Name Get-WindowsAutopilotInfo -Scope AllUsers -Force
Double check that you deleted all the files and installers you downloaded before proceeding.
When done, press
WIN + Rto open Run prompt, typeC:\Windows\System32\Sysprep\sysprep.exe /generalize /oobeand press Enter:Windows will “generalize” the image and shutdown. Do not restart once generalization is done.
Boot the disk using the default Windows ISO, or a bootable windows USB, not the harddisk. Once booted from install media, press
Shift + F10to open a command prompt. Run the following commands:Type
diskpartand press enter.Type
list voland press enter.Type
select vol 1(or the volume that contains Windows)Type
assign letter=Cif there is no letter assigned to the volume alreadyType
Exitand press enter.Using the info you just gathered, run the following command to capture the windows image:
dism /capture-image /imagefile:C:\Image\install.wim /capturedir:C:\ /ScratchDir:C:\Scratch /name:"Win11" /description:"My Custom Win11 Image" /compress:maximum /checkintegrity /verify
Dism will capture the image. Wait until it’s done, restart reference machine and let it boot normally from hard disk. Notice that boot will take quite some time because reference machine goes through automated OOBE.
When reference machine has booted to desktop, sign in to your administrator account using password you set in answer file in part 4 step 8.
On technician machine, delete
ISO_Files\Sources\install.wimfileWhen reference machine has booted to desktop, copy the newly captured Windows image (install.wim file) from
C:\Imagefolder to technician machine toISO_Files\Sourcesfolder, same folder from where you deleted the originalinstall.wimin previous step.
Part Eight: Create USB Install Media
Create Custom ISO
First we will create a custom ISO image that can be used to create a virtual machine, or to create a bootable usb drive for installation on physical machines.
- Open a
Deployment and Imaging Tools Environmentshell. Its part of the Windows ADK and should have been installed in part 1. You can find it under Windows Kits in your programs list. - Change to the root of C: drive:
cd\ - Run the following command to create the iso. Replace
C:\Win11with the path to the folder containing theISO_Filesand the customizedinstall.wim. ReplaceC:\XenWin11.isowith the file path where you want to save the new iso file.
oscdimg.exe -m -o -u2 -udfver102 -bootdata:2#p0,e,bC:\Win11\boot\etfsboot.com#pEF,e,bC:\Win11\efi\microsoft\boot\efisys.bin C:\Win11 C:\XenWin11.isoCreate Bootable USB
You can use any method to create the bootable USB as long as it supports UEFI. Thus, Rufus is recommended as it has UEFI support and makes the process easy and straightforward.
- Download Rufus
- Choose the USB drive for the
Device. Then click select to open the custom ISO made in the previous section. - For partition scheme, select
GPT. - For Target system, select
UEFI (non CSM). - For filesystem, select
NTFS. - See screenshot below for reference of what it should look like. Click start to begin creating the bootable USB. Rufus has a cool feature that lets you disable/modify the Windows ISO. Do not select any of those checkboxes.
Part Nine: Deploy the Custom Windows Image
Install Custom Win11 Image
Now that you have a bootable usb and iso, you can begin installing the custom image to Xenter laptops.
- Boot the target computer with the USB or ISO. It should begin installing windows automatically using the custom configurations.
- Once installed, the computer will reboot. You will be presented with a screen to pick the devices name. Use the naming convention:
XMD-AssetTagNumberHere. For example, a laptop with asset tag number 0001 would be given the nameXMD-0001. - Next you will be asked to select whether you will set up the device for personal or work use. Do not select either option. First, you must register the device with Windows Autopilot. Note that an internet connection (ethernet/wired) is required for this step. There are a few ways to add the computer’s hash to Windows Autopilot:
- Note: This only needs to be done once for a Xenter machine. Check Intune under Windows Autopilot Devices to see if the serial number is present. If the device is already registered in Autopilot you can ignore this step.
The
Get-WindowsAutopilotInfoscript is part of the custom Windows image (see 7.10 for those steps). All you need to do is open a shell (SHIFT + F10) and run the following commands:powershell $env:Path += ";C:\Program Files\WindowsPowerShell\Scripts" Set-ExecutionPolicy -Scope Process -ExecutionPolicy RemoteSigned Get-WindowsAutopilotInfo -OnlineOne of the easiest options is to put the
Get-WindowsAutopilotInfo.ps1script on a usb, plug it into a computer with the freshly installed custom image, and then open a command prompt (SHIFT + F10) while Windows is still on the screen prompting for personal or work/school account, mount the USB, and then execute theGet-WindowsAutopilotInfoscript.If the script for some reason is not installed, open a command prompt (
SHIFT + F10) and run the following commands:
powershell
[Net.ServicePointManager]::SecurityProtocol = [Net.SecurityProtocolType]::Tls12
$env:Path += ";C:\Program Files\WindowsPowerShell\Scripts"
Set-ExecutionPolicy -Scope Process -ExecutionPolicy RemoteSigned
Install-Script -Name Get-WindowsAutopilotInfo -Scope AllUsers
Get-WindowsAutopilotInfo -Online
Part Ten: Issue Computer to User
At this point, the computer has been registered to Windows Autopilot and will show up as an intune and AD device on Azure. You can issue the laptop to a user by following these steps:
- Assign the user to the computer in Intune.
- From Intune’s Admin Center, go to Devices > Enroll Devices > Devices.
- Find the computer in the list using the serial number, select it, and at the top click assign to user. Choose the user accordingly and save.
- This step requires a wired internet connection so that the user can download policies, apps, and configurations from the cloud. Once connected to ethernet, start up the computer and have the user select the option to sign in with a Work/School account. Once they sign in, it will begin the OOBE and set up process. Then it will begin downloading all of the configs and the automated provisioning process will start.
- It may take anywhere from 30 min to 1 hour to complete the provisioning. But once provisioning is done, the user will be able to login to the computer using their intune credentials and Azure AD admins will be able to remotely manage the computer as well.
- If you are not using a KMS server, then you need to activate windows with a valid license instead of the generic KMS license included in the custom windows image. Most modern laptops have a license tied to the firmware and it can be recovered using the command in check_firmware_license.md
Troubleshooting
Bitlocker Encryption Error: Bitlocker can NOT be activated during the inital set up of the reference VM. If you boot the VM with internet access the VM will automatically enable Bitlocker. Decrypting and clearing TPM cannot fix the problems caused by this. Thus you must start the VM without internet access by leaving the network adapter as
Not connected. Additionally, delete anyWindows.oldfolder found in the root C drive. Example picture of error log below.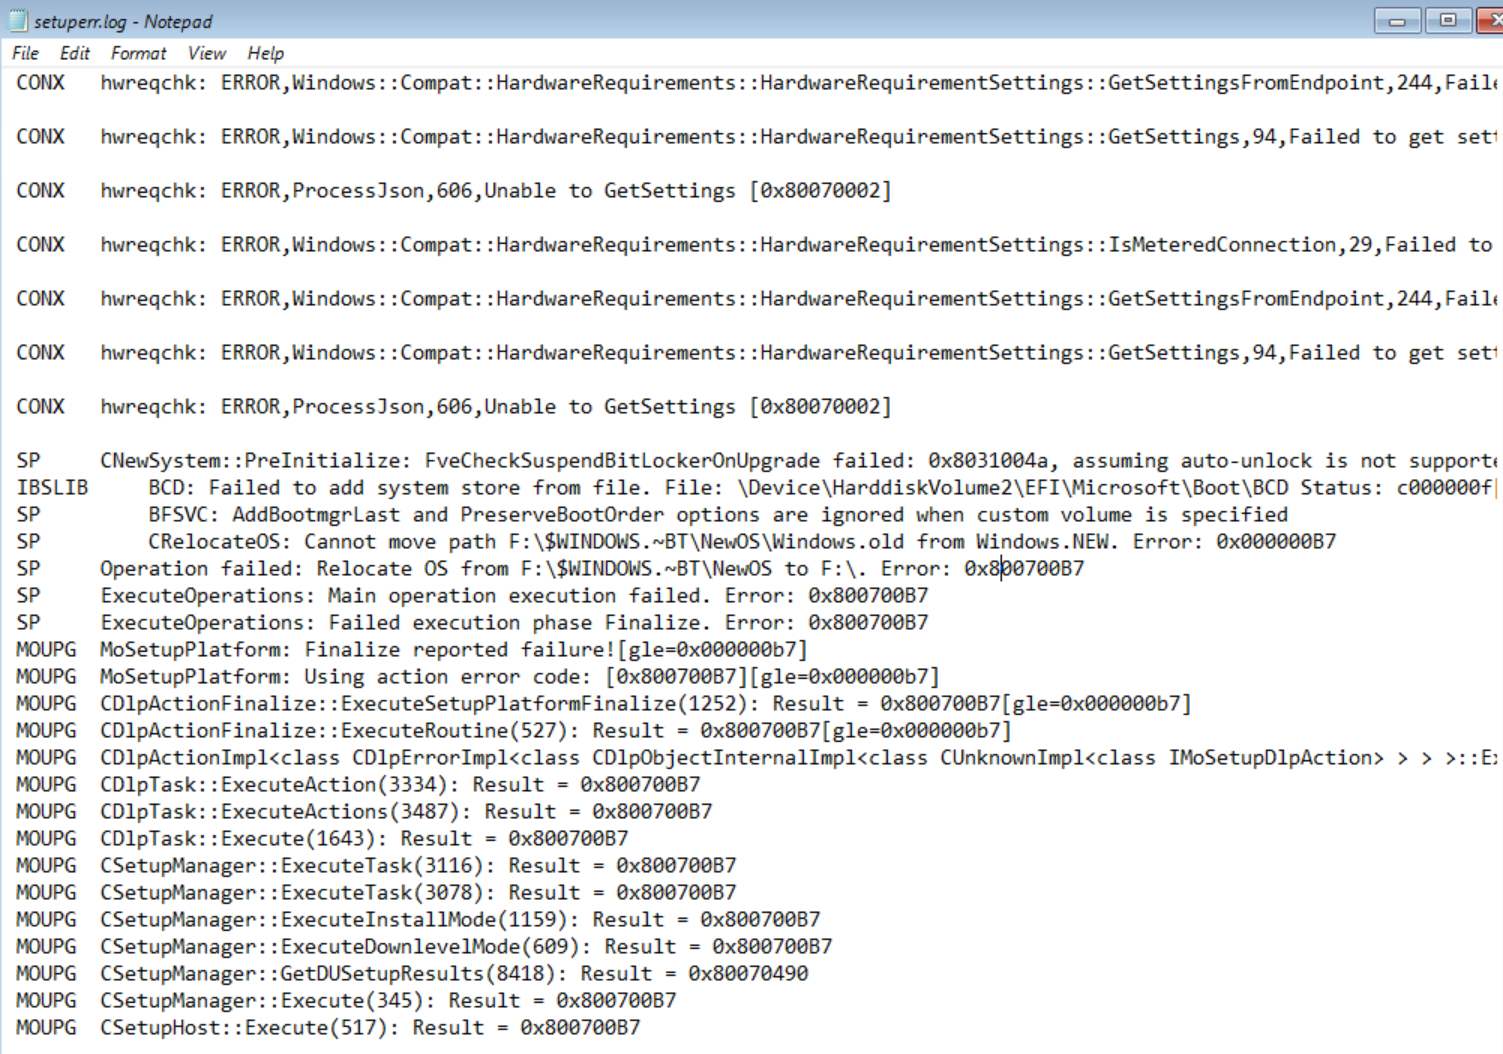
bitlocker_error